
A leaking tap is not just an annoyance; it can lead to wasted water, increased bills, and potential water damage if left unattended. Ignoring dripping taps can exacerbate these consequences, as they signify underlying issues like damaged tap seats or washers, leading to significant water and financial wastage over time.
Tackling the issue requires a systematic approach to firstly identify the type of tap and leak, followed by gathering the necessary tools and materials for the job.
A thorough understanding of the internal mechanisms of your tap is advantageous when addressing a leak, as the cause can range from worn-out washers to corroded valve seats.
Before any repair work can begin, it’s essential to shut off the water supply to prevent any accidents or further damage.
This step is often found beneath the sink or basin where isolation valves are located.
Once the water is turned off, dismantling the tap allows access to the components that are likely causing the leak.
It is critical to handle all parts with care to avoid damage and to remember the order of disassembly, which will facilitate a smoother reassembly process.
After replacing faulty parts, reassembling the tap and turning the water supply back on will enable you to test the tap.
Checking for leaks after the repair is completed is the final step ensuring the problem has been resolved.
The process may uncover more complex issues, at which point seeking professional help is recommended.
Key Takeaways
A methodical approach is key to diagnosing and fixing a leaking tap.
Water supply must be cut off and the tap carefully dismantled before repair.
After fixing, the tap should be reassembled, water turned back on, and the tap tested.
Recognising the Type of Tap and Leak
Before attempting repairs, one must have a clear understanding of the type of tap installed and the nature of the water leak. Incorrect diagnosis can lead to ineffective fixes and further damage. For instance, mixer taps often incorporate a ceramic disc valve, which requires a different approach than
Identify the Tap Type
Taps vary greatly in design and functionality.
Mixer taps blend hot and cold water, often operated by a single handle.
Traditional pillar taps feature two separate handles for hot and cold water, common in older homes.
The monobloc tap, typically found in modern bathrooms and kitchens, operates with a single lever or dual handles and requires only one hole in the sink for installation.
To identify the tap type, examine the number of handles and the way in which they control water flow.
Mixer taps will offer a combined flow, whereas traditional pillar and monobloc taps may have distinct controls for temperature adjustment.
Determining the Source of the Leak
A dripping tap often indicates a worn-out washer or O-ring, primarily found in traditional taps. For a leaking mixer tap, the cartridge inside may have deteriorated.
A leaking tap at the base or spout signifies a faulty washer, damaged O-ring or a degraded valve seating.
To determine the source:
Inspect the spout for a constant drip, suggesting washer or O-ring issues.
If water seeps from the handle, the leak is likely within the tap’s internal components.
Check the base for leaks, as these hint at compromised seals or gaskets.
Finding the precise source is crucial to applying the correct fix and preventing further leakage.
Tools and Materials
Before attempting to repair a leaking tap, it is vital to gather all the necessary tools and materials. Ensuring you have the correct items at hand will facilitate a smoother repair process.
Essential Tools
Adjustable spanner: A must-have for loosening and tightening nuts.
Screwdriver set: Needed for handling various screw types.
WD40: Useful for loosening tight components.
Recommended tools include:
Spanners of various sizes
Pliers for grip and leverage
Selecting the Right Washer and Parts
Washers and O-rings: Confirm whether a rubber washer or O-ring is required, and make sure it matches the size and shape of the old one.

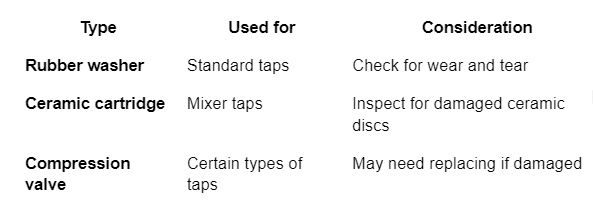
Ceramic disc cartridge: For mixer taps, ensure the ceramic disks are intact; a damaged ceramic cartridge will necessitate replacement with a new washer suitable for water softeners if in a hard water area.
Shutting Off the Water Supply
Before attempting any repairs on a leaking tap, it is essential to cut off the water supply to prevent water from gushing out during the process.
This can be achieved by using either the isolation valve closest to the tap or the mains stopcock.
Locating the Isolation Valve
The isolation valve is typically situated on the pipes just beneath the sink or behind the toilet.
It can be identified by its flat screw or a small lever.
Turn the valve clockwise using a flat-head screwdriver or by hand to stop the water flow.
For a metered water supply, one should also ensure the valve is fully closed to avoid inaccurate meter readings.
Step 1: Search for a small valve near the base of the tap.
Step 2: Turn the valve clockwise until it cannot turn any further.
Using the Mains Stopcock
If there is no isolation valve to be found or if the valve is not functioning properly, one will need to use the mains stopcock.
It is commonly located under the kitchen sink, in a utility room, bathroom, or sometimes outside.
To cut off the supply using the mains stopcock, turn it clockwise to shut it off. This will stop the water supply to the entire house, which can be necessary when dealing with a major leak.
Step 1: Locate the mains stopcock, often found in the kitchen.
Step 2: Twist the stopcock clockwise to halt the water supply.
After turning off the water, open the tap to release any remaining water and pressure in the pipes. This ensures a safer work environment for fixing the leaking tap.
Dismantling the Tap
When fixing a leaky tap, one must first dismantle it to either replace a washer or service the valve.
Precise and careful handling is essential to avoid damage to the tap and plumbing.
Removing the Tap Handle
The tap handle must be removed to access the internal components responsible for controlling water flow.
To begin, one should shut off the water supply to prevent any accidents.
An old cloth should be placed over the drain to prevent dropped parts from disappearing down the pipe.
The cap on top of the tap handle is often concealing a fixing screw, which needs to be unscrewed with an appropriate tool, usually a screwdriver.
After the screw is removed, the handle can be lifted off, revealing the headgear underneath.
Taking Out the Valve or Cartridge
With the handle removed, attention is turned to taking out the valve or cartridge—a crucial step in fixing a drip or total tap replacement.
One should slowly and meticulously unscrew the headgear nut that secures the valve or cartridge within the tap body.
It is imperative to hold the tap body steady, often best achieved with a pipe wrench, while using an adjustable spanner to turn the headgear nut.
Once loose, one can remove the valve or cartridge, at which point, it’s common to replace the washer or O-ring if the fault is a drip caused by wear.
If the valve seat within the tap body is damaged, it might also need work.
During reassembly, one must ensure all parts are secured and aligned to maintain the correct water pressure and prevent future leaks.
Reassembling and Testing the Tap
After replacing the necessary components, one must reassemble the tap and test it to ensure the leak has been successfully repaired.
Precision during reassembly and a thorough testing procedure are critical to confirm the tap’s functionality and to avoid future leaks.
Securing the New Components
When installing new components such as a washer or O-ring, it’s essential to secure them properly.
The washer, which is integral in a leak repair for both the hot water tap and a dripping mixer tap, should sit evenly on the tap seat.
One should tighten the related nuts and screws with appropriate force—over-tightening may cause damage, whereas under-tightening might not effectively stop the leak.
Ensuring a Watertight Seal
Achieving a watertight seal often requires the application of a sealant specific to tap or faucet washer replacements.
The user should apply it carefully, according to the manufacturer’s directions, around the O-ring or at the base of the seating area, if relevant.
Before restoring the water supply, they should ensure that all parts are aligned correctly and the seal has been checked for integrity.
Following the reassembly, they can gradually turn on the water supply to test the apparatus.
The tap should be operated to observe any sign of leakage, indicating that the seal replacement has been successful or that further adjustments are necessary.
Frequently Asked Questions
This section provides concise solutions to common issues encountered when dealing with a dripping tap.